Going out of bounds or losing a golf ball is unpleasant. And either will cost you unwanted strokes, that may ultimately lead to a less-than-ideal day of golf.
Still, it’s the “Hazards” that can really break you into little pieces during a round … and leave you posting a large, tragic score. These things are so potentially traumatizing I think they are worthy of a Leonard Cohen quote:
“You want it darker
We kill the flame”
From his last album, “You Want It Darker”, released just days before Cohen’s death.
Leonard Cohen was not a golfer, but I would like to think that he might appreciate my use of a snippet from his song here. It really is an apt description of the potential danger and torment that a golf course’s hazards can provide.
Red and Yellow Stake “Hazards”?
Yellow stakes? You may already be thinking, “I don’t think I’ve ever seen those on a golf course. Enlighten me.” I will, but let’s first have a bit of a chat about the Red Stake penalty areas.
Red Stakes
The presence of Red Stakes on a course in golf designates a red penalty area (historically called a lateral hazard). They mark areas like ponds, streams, or rocky ditches running alongside the hole. If your ball lands on the other side of the Red Stakes you are officially in the hazard, but fortunately you have the choice to “play it as it lies” if you like.
So, this is better than a White Stake area because you can hit out of it. Unfortunately, often you really can’t hit it out of these areas, but that is neither here nor there. The option exists. Even if you hit it into a narrow, shallow creek, you do have the choice, if you can get a club on the ball, of hitting it out of there. Larger bodies of water, water hazards, are another kettle of fish … to throw in a bad pun.
Your Red Stake Penalty Area Options
Playing it – You can play your ball as it lies inside a red penalty area without any penalty if you choose to. Remember, even in the hazards, you are playing “improve your lie” under our new retirement rules.
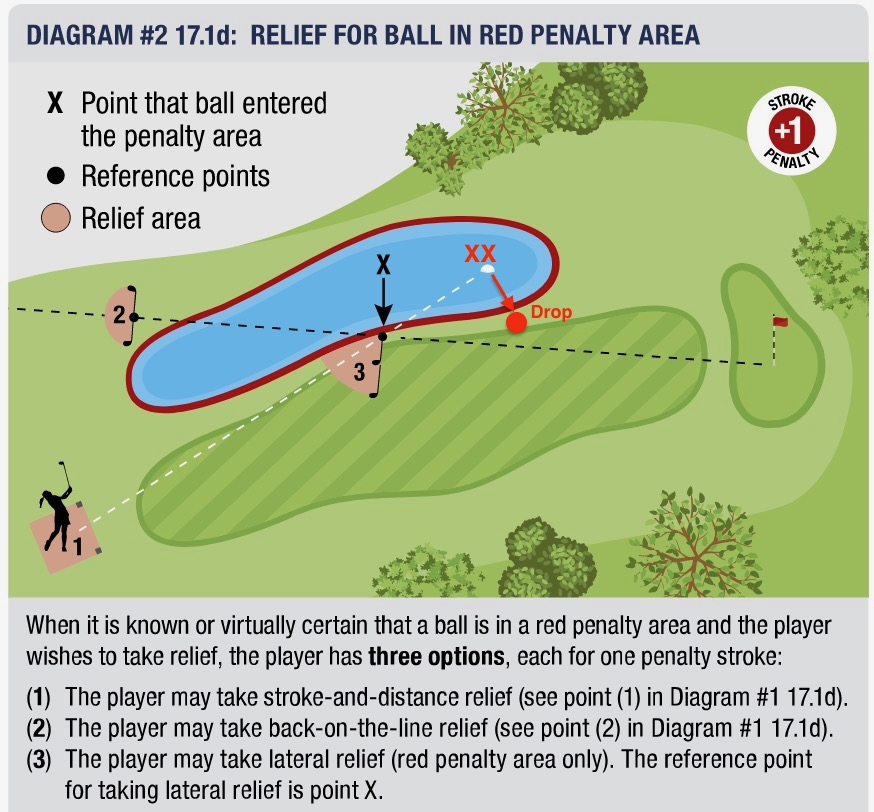
Relief For One Penalty Stroke – If you decide you cannot or do not want to play it, you have three relief choices:
- Stroke-and-distance:Play a ball from where you made your last stroke. You aren’t required to play stroke and distance here, which is nice, but you can if you want. Often this is done on Par 3s.
- Back-on-the-line:Go straight back from the hole through the spot where the ball last crossed the edge of the penalty area and drop a ball.
- Lateral relief:Drop a ball within two club-lengths of the exact point where the ball last crossed the edge of the penalty area, no closer to the hole.
This little USGA video demonstrates the options available to you when you’re in a penalty area.
Modified Lateral Relief – I am going to propose a kinder and gentler situation here as well, even though there are already many relief options. My suggestion is a slight modification of the lateral two club links relief. Instead of taking the two club-lengths at the exact point where the ball last crossed the edge of the penalty area, I propose that you take relief directly opposite where the ball entered the water, not the hazard.
I have modified a graphic I found to demonstrate what I mean. It shows you how the three means of relief can be taken. I have indicated with red letters, an arrow, and a dot, where I think you should be allowed to drop for relief. This will speed up play and dry some of the tears associated with going into a water hazard. You do have to count a penalty stroke, of course.
Yellow Stakes
Historically yellow stakes have been used for hazards you must carry over (like a pond directly in front of a green). Many modern golf courses have phased out yellow stakes entirely and mark every body of water on the course with red stakes, even when the hazard is a forced carry over something bad right in front of you.
If you should ever come across yellow stakes and hit into the hazard area just play it like a red stake penalty area, including taking Lateral Relief (not allowed in yellow stake areas) if you want to.
Water Hazards … The Watery Grave
We need to talk a bit more about the LARGER WATER HAZARDS specifically. These are water hazards from which there is no return and which will often drive a spike into the heart of a good round of golf. Game over!
If you hit the ball into a deep pond with a mighty splash, you are out of luck. All you can do is drop according to the relief options, take a penalty stroke, and have another go at it. It is not unusual to find several bodies of water on a golf course like this. Here it is an image of the scariest kind – water surrounding an entire green so that it becomes an island with a narrow access peninsula.

There’s really no way around playing one of the standard rules stated above here, but you can exercise a little flexibility around the rigidity of the rules. Here is a scenario. You have a solid drive, and the green is well within range for your second shot. You swing away … and you go into the water. You move up to an allowed relief spot, take a penalty stroke, drop a ball, and hit again. This shot also goes into the water… Ouch! You are already counting five strokes with more to come.
Here is my suggested change to the rule. If you go in the water twice, then you simply circumnavigate the water and drop a ball 3 or 4 feet off the putting surface somewhere along the line between where your ball went into the water and the flag stick, take a stroke penalty, and play from there. And there is no reason why you and your group couldn’t consider modifying this further by choosing to take the suggested drop after hitting just one ball into the water.
This is the type of situation that may turn into a use of “my maximum score on a hole rule” that I mentioned in Part 1, and soon to be detailed below.
Sand Trap Hazards … On the Beach
This is a very different type of hazard. There is no losing a ball here or having to take a penalty stroke, but you are required to hit out of the diabolical things.
Sand traps or bunkers as they’re frequently referred to are one of those things on a golf course that are incredibly time-consuming and expensive to properly maintain. A lot of the courses where we play feel more like hard packed earth covered with a thin protective layer of sand. They are sub-optimal.
On some courses, where they don’t even make much of an attempt to keep them properly maintained, they inform you that you can either play out of the bunker or take a free lift out of it at your own discretion. You and your golf associates may choose to do that if you feel it is appropriate for your situation.
Here is another option that is a violation of the rules. However, it does allow you to play the type of shots that the creators of the sand trap concept envisioned.
If you end up in a bunker – get a rake, find a spot close to where you ended up… It’s tough enough getting out of these things without worrying about doing it precisely where your ball lies. But you can do that too if you like. Take the rake and rake the living bejeebers out of a spot until you’ve created a nice patch of loose, fluffy sand, put your ball down and swing away. At least this provides you with an opportunity to play out of a bunker with sand that is the quality it was meant to be.
If the hazards are in really bad shape, I would recommend that your group take a free lift out of the bunker, take a drop reasonably close to it, and hit away.
Dangerous Animal Hazard
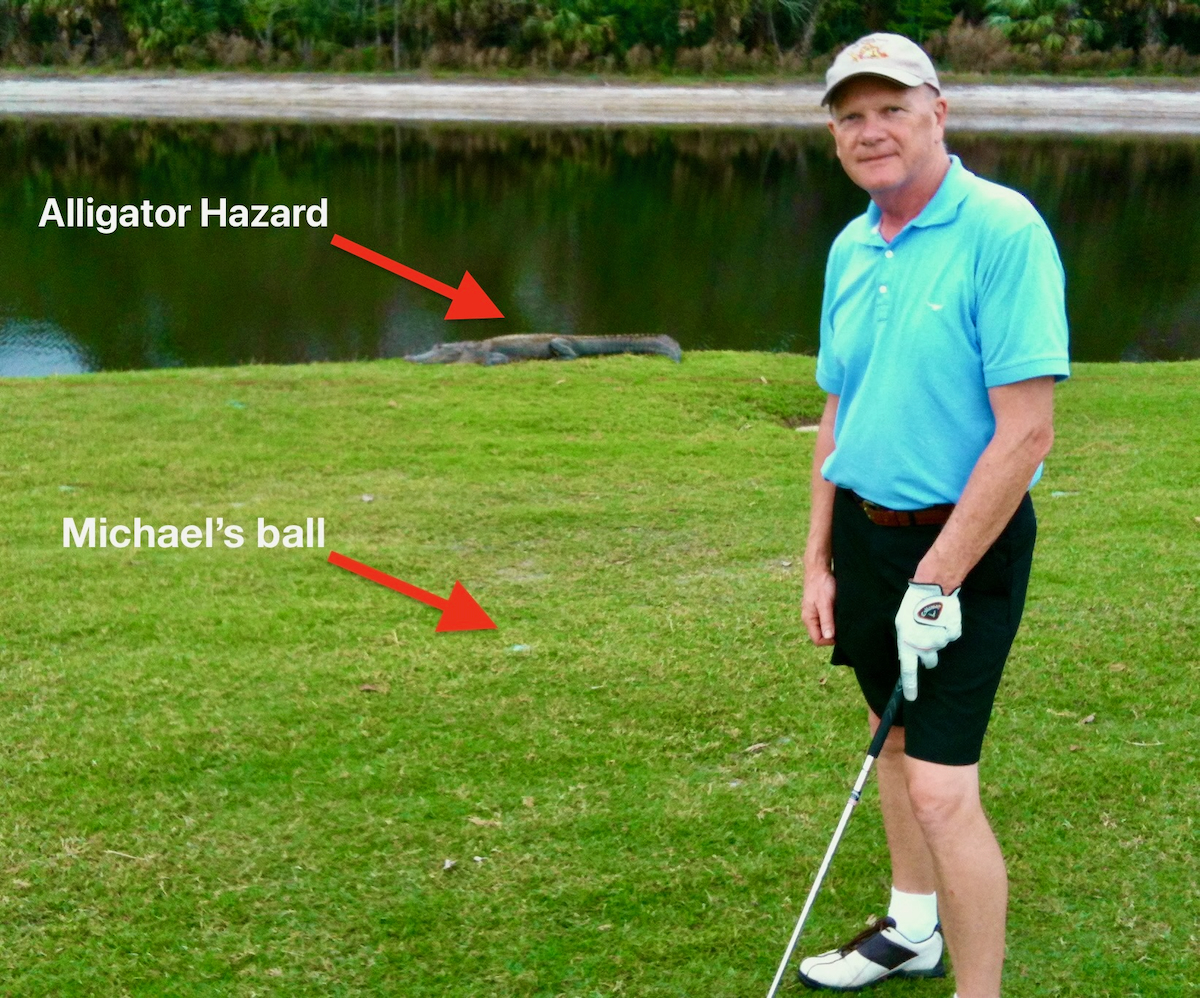
Okay, this started out as me having a bit of fun when I came across a few pictures of friends, and me posing near alligators while playing golf in Florida. I’m sure you’ve seen them yourself if you’ve played down there. It did make me think though, that when playing up in Muskoka, there is a chance that a bear may wander onto the course. What do you do?
Well, my friends there is a rule for that. This is one official rule everyone should adhere to 🙂
Under official USGA Rules of Golf (Rule 16.2), you are entitled to free relief from a dangerous animal condition, such as an alligator, if playing the ball as it lies would pose a risk of serious physical injury.
Maximum Score Per Hole Rule
If having a kinder and gentler round of golf and maintaining pace of play is a priority, we must consider setting out a rule that defines a maximum number of strokes above par on any given hole that anyone, or just one or two specific golfers in your group, would take. My original thinking was, let’s make that either triple bogey, or quadruple bogey.
Everyone loves seeing one of their fellow golfers have a very serious blowup hole that results in a gigantic score. The favourite in my golf group was posted by “The-man-who-must-not-appear-on-Facebook”, who took a nine on a Par 3. It was a tee shot into a bunker, followed by a bunker shot that went into another bunker, then a shot back to the same bunker, back to the other bunker, back to the same bunker, on to the green, finished off with a three putt.
Fun to watch, but it seriously sucks when it happens to you… psychotic episode inducing! I know you are all thinking, “been there, done that”. Golf is supposed to be fun. There comes a point in a hole that you’re in the midst of obliterating when you’re no longer playing golf; you’re conducting an archaeological dig.
What follows is a couple of exercises that I played with to arrive at what I believe should be the guideline for determining the maximum score allowed on any hole.
We Could Follow the Net Double Bogey Rule
I really couldn’t decide on the number so I thought I would reach out. First, I asked my golf mates what they thought. A couple of them reminded me about the “net double bogey” rule that is used by individuals who are tracking their golf handicap. Here is an example covering the basic guidelines from the USGA.
“A player with a Course Handicap of 15 receives one handicap stroke on holes with a stroke index of 1 through 15 on the scorecard.
On a par 4 hole with a stroke index of 10, the player’s maximum hole score is 7. Double bogey (6) + 1 handicap stroke = 7.”
What that really breaks down to is a maximum score on most holes of triple bogey. When it says holes one through 15, it does not mean the hole number, it means the handicap for each hole, typically as stated on the scorecard like this one below.
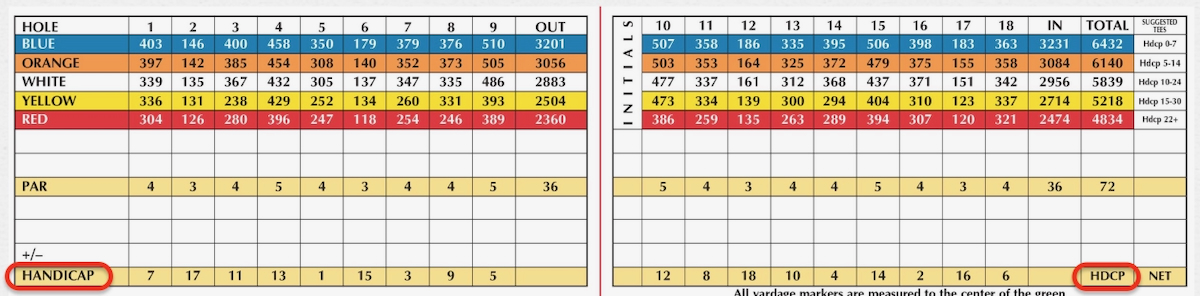
Every golfer knows what the “handicap” numbers signify. In theory, number “1”is the hardest hole and “18” is the easiest, with every other hole being scaled by degree of difficultyby degree of difficulty. I don’t think most golfers know what those are used for… Now you know.
So, low handicappers are probably using the “net double bogey” rule already.
It probably makes sense that the same principle should be applied to mid to high handicappers. They should score no worse than triple bogey (e.g. Par 4 – Double bogey (6) + 1 handicap stroke) even if they are not tracking their handicap. Beginners and very infrequent golfers should probably be playing “net double par” (e.g. Par 4 – Double Par (8) + 1 handicap stroke = 9).
What would Brian Boitano…er ChatGPT…Do
Forgive the South Park reference. Sometimes I just cannot control myself :-).
Given that I have been on a bit of an AI roll recently, I decided to pose the question concerning use of triple bogey or quadruple bogey to ChatGPT. It ended up being a little harsher than what my golf buddies were suggesting and the Net Double Bogey rule that was recommended. It said I should be going with four over par, quadruple bogey. Its reason being:
“I think this is a very good rule for a set of “retired/high-handicapper” golf rules, and I would lean toward maximum score of four over par rather than three over par.
The key question is what you’re trying to accomplish: make the game more enjoyable and keep a disastrous hole from wrecking the round, while still retaining enough of the challenge and strategy of golf.
I think +4 is the better choice for high-handicap golfers.”
Because ChatGPT loves doing its own thing, it alternatively suggested that there could in fact, be two different maximums for different holes.
“You could make the rule +3 for par 3s and +4 for par 4s and par 5s”.
The Decision
After much consultation and internal debate, I have decided to go with… A maximum score on every hole of triple bogey, or 3 over par.
Deciding When to Take the Maximum Hole Score
There are a couple of options on how you can approach getting to that final score. One is simply to play the hole out, think about how you don’t want to ever do that again, and record the lower “maximum score”.
The second option is: when it becomes clear at some point during the play of a hole that you will exceed the maximum amount you simply pick up your ball, tuck it in your pocket, and sit on your golf cart pouting until everyone is finished the hole… guilty as charged. 🙂
At Last! … We Made It to the Green
When I say “we made it to the green” I mean either on the putting surface or in the general vicinity. We are either putting or chipping/pitching onto the green.
This really is the area where most recreational players can make or break a score on a hole.
Near the Green – If you are in the longer cut of grass around the green, you can do as you do everywhere else “improve your lie”. You can even do this if you are sitting on the putting surface “Fringe”. Move it around and fluff it up a bit with your clubhead. But if you don’t hit a proper chip or pitch shot, and you’re still in the long grass afterwards, it is too bad for you. You need to keep hitting until you get on the green. Once again, it is not a free-for-all.
On the Green – Much like playing out of the longer grass surrounding the green, play on the green is generally played by the existing rules. I am suggesting some very minor modifications though.
Who Putts? – Once on the green typically the rule for putting order is as stated in the official rules. The person farthest away from the hole putts first and then second furthest, etc. If you agree to it in your group, you can play “ready golf” if everyone is OK with that.
A Little Wiggle Room on Ball Placement – Again, because we’re not playing on pristine golf courses and the greens on occasion can be suboptimal don’t worry about marking your ball and placing it back exactly where it was on the green to begin with. If there’s a ball mark or some other little obstruction directly in front of your ball, move it a couple of inches left or right to make sure you’ve got a reasonable chance of making it a good putt.
Play “Two Putts” – In the spring when the putting greens are definitely not at their best it’s always a good idea to play “2 putts”. Never count more than two putts on any hole if your chances of making most of your putts are greatly reduced by an irregular putting surface.
Establish a “Gimme” Length – Putting out every single putt is highly frustrating, and more importantly time consuming. All older/retired golfers should be incorporating a short distance Gimme into their game.
Every group should agree to the length of a Gimme putt, and those who want to participate should play according to that decision. A common length given is typically around 3 feet. And you need to be able to measure the distance not just eyeball it. A standard putter is about 35 or 36 inches in length, so designate one putter in the group and use it.
Decide on whose putter in your group you are going to use to measure with. The measurement is done by putting the head of the putter in the hole and attempting to touch the golf ball in question with the other end of it. Even if it just touches by a whisker, it is a gimme.
A final Thought – Tee Selection
Golf is a hard game and unless you are a low handicap golfer retirement is the perfect time to make the game easier to play, less stressful, and generally more enjoyable. Changes to the game that I have laid out here will do that for you.
However, there is one other choice you need to make to follow the “kinder and gentler” principle. That being, from which set of tees you will play. Stop beating yourself up and play from whichever set of tees are most comfortable for you.
At some point, everyone should end up playing from the forward tees. The forward tees are designed for beginners, high-handicappers, juniors, seniors, and anyone who drives the ball under 200 yards.
For a more in-depth look at this issue please read the USGA’s “Helping Golfers Choose Their “Best Tees”.
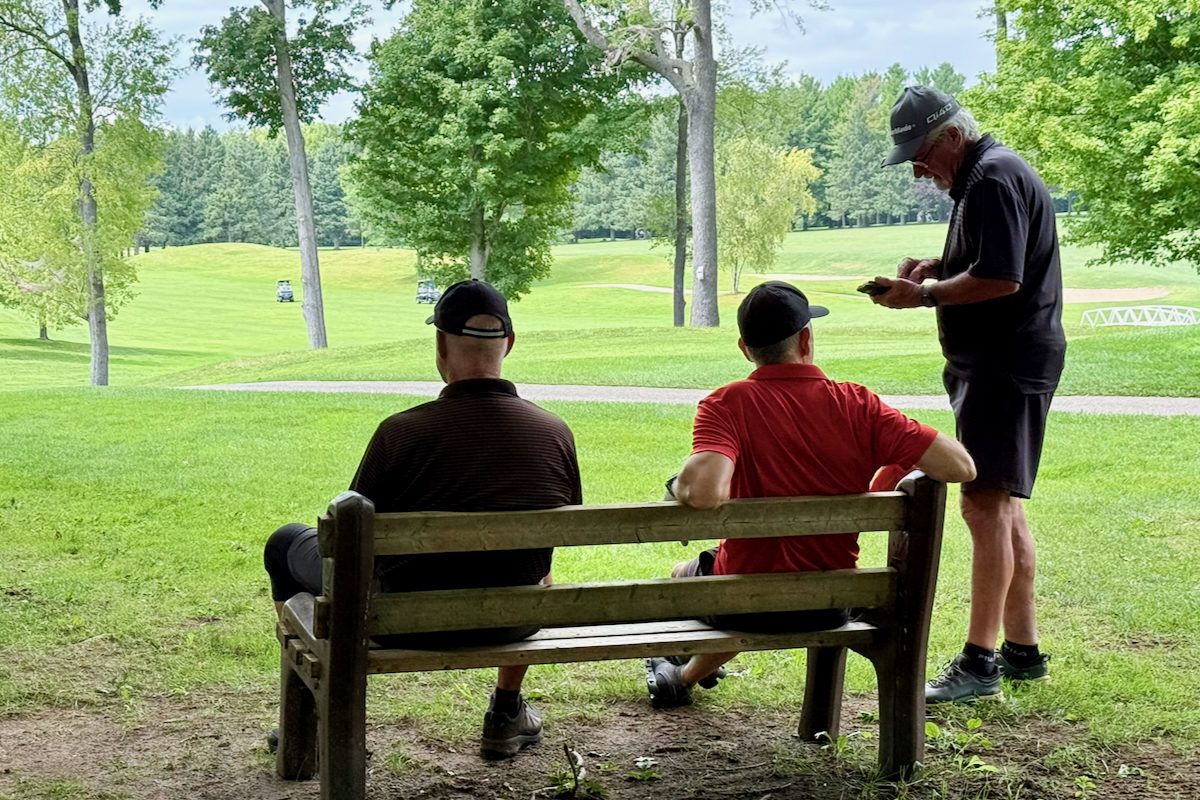
P.S Many thanks to my golf associates who allowed me to use photos of them in this series.